[React Native] AnalyzerでBUILD FAILEDな時の対処法
Projectのディレクトリを移動されたらreact-native run-iosで失敗するようになった。
** BUILD FAILED **


The following commands produced analyzer issues:
        Analyze /Users/shohey1226/git/Kagami/node_modules/react-native/ReactCommon/yoga/yoga/Yoga.c

        Analyze /Users/shohey1226/git/Kagami/node_modules/react-native/ReactCommon/yoga/yoga/YGNodeList.c
(2 commands with analyzer issues)

The following build commands failed:
        Analyze /Users/shohey1226/git/Kagami/node_modules/react-native/ReactCommon/yoga/yoga/Yoga.c
        Analyze /Users/shohey1226/git/Kagami/node_modules/react-native/ReactCommon/yoga/yoga/YGNodeList.c
(2 failures)
キャッシュを使用してBuildを試みてて失敗しているようなので、ビルドを消す。
$ rm -rf ios/build
$ react-native run-ios
React Native Router Fluxでタブの履歴を残す方法
InstagramのようにAndoridのバックボタンで前のタブに戻るようにするためにどのタブが前のタブか知る必要があります。React Native Router Flux(with Redux)を使っていて、これを実現するために下記のようなReducerを作りました。
const initialState = {
  scene: {},
  tabHistory: [],
};

export default function reducer(state = initialState, action = {}) {
  switch (action.type) {
    // focus action is dispatched when a new screen comes into focus
    case "focus":
      return {
        ...state,
        scene: action.scene,
      };

    case 'REACT_NATIVE_ROUTER_FLUX_FOCUS':
      if(action.scene.name === "tabBar"){
        if(state.tabHistory.length === 0 || state.tabHistory[0] !== action.scene.children[action.scene.index].name){
          return {
            ...state,
            tabHistory: [action.scene.children[action.scene.index].name, ...state.tabHistory ].slice(0, 10)
          }
        }
      }
やってることは、FOCUSしたときにtabHistoryとして、Arrayに追加してるだけです。無限に履歴を残す必要はないので10個で制限してますが、もしかしたら2つでいいかもしれません(最初の要素は現在のタブになるので二つ以上は必要)
で、これを下記みたいな感じでBackAndroidで使用すれば良いでしょう。
  handleAndroidBack(){
    const tabHistory = store.getState().router.tabHistory;
    if(tabHistory.length > 1){ // 0 is the current tab
      const previousTab = tabHistory[1];
      switch(previousTab){
        case "feeds":
          Actions.feeds();
          return true;
        case "discussion":
          Actions.discussion();
          return true;
        case "profile":
          Actions.profile();
          return true;
        case "notification":
          Actions.notification();
          return true;
        case "others":
          Actions.others();
          return true;
      }
    }
   return false;
  }
[React Native] Androidエミュレーターでのデバッグ方法
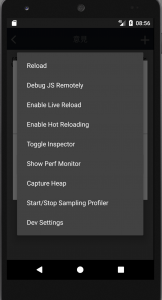
CMD-mでデバッグwindow表示して、Debug JS remotelyをクリック。
でも、ものすごく遅いので、ターミナルから下記を走らせた方がいい。
(表示はChromeのデバッグほどきれいじゃないけど。。)
$ adb logcat *:S ReactNative:V ReactNativeJS:V
コマンドラインからAndroid Emulatorを起動する方法
React Nativeの人なので、どうやってEmulatorを起動するかわかりませんでした。React NativeのGet started(ver 0.38)を終わって、 Android Studioからは起動できることを確認しています
$ android list avd
*************************************************************************
The "android" command is deprecated.
For manual SDK, AVD, and project management, please use Android Studio.
For command-line tools, use tools/bin/sdkmanager and tools/bin/avdmanager
*************************************************************************
Running /Users/shohey1226/Library/Android/sdk/tools/bin/avdmanager list avd

Available Android Virtual Devices:
    Name: Nexus_5X_API_25
  Device: Nexus 5X (Google)
    Path: /Users/shohey1226/.android/avd/Nexus_5X_API_25.avd
  Target: Google APIs (Google Inc.)
          Based on: Android 7.1.1 (Nougat) Tag/ABI: google_apis/x86_64
    Skin: nexus_5x
  Sdcard: 100M
---------
    Name: Nexus_5X_API_25_x86_64
  Device: Nexus 5X (Google)
    Path: /Users/shohey1226/.android/avd/Nexus_5X_API_25_x86_64.avd
  Target: Google APIs (Google Inc.)
          Based on: Android 7.1.1 (Nougat) Tag/ABI: google_apis/x86_64
    Skin: nexus_5x
  Sdcard: 800M
Snapshot: no

$ emulator -avd Nexus_5X_API_25
上記コマンドできるはずですが、ライブラリのエラーがでて起動しません。
$ emulator -avd Nexus_5X_API_25
[140736266523584]:ERROR:./android/qt/qt_setup.cpp:28:Qt library not found at ../emulator/lib64/qt/lib
Could not launch '../emulator/qemu/darwin-x86_64/qemu-system-x86_64': No such file or directory
Stackoverflowを参考にして~/.bashrcにラップするfunctionを追加で無事エミュレーター起動しました。
# $HOME/.bashrc
function emulator { cd "$(dirname "$(which emulator)")" && ./emulator "$@"; }