まる二日間格闘して設定が完了した。かなりの試行錯誤したので備忘録としてまとめてみる。
Goal
- s3上のファイルにパスワードをかけて直接ファイルをダウンロードできなくする。
- Webサービスにログインしているユーザは、ファイルをダウンロードできる。
結論
結論から先に書くと、下記のような感じ。前提として、https + Basic authenticationを信頼する(http + basic authはダメ)。
- Clientに
crossorigin="anonymous"をセットし、http requestにorignを含ませる。 - Cloudfront+LambdaでBasic Authでフィルタリングする。Originを含む場合はパスワード必要としない。
- S3とCloudfrontではCORS関係のヘッダをパススルーする。
クライアント(Web browser/HTML)の設定
今回は動画ファイルのダウンロード・再生のUIだったので、下記のようにcrossoriginを設定する。
<video width="100%" height="75%" controls="" crossorigin="anonymous" src="https://my.example.com/xxxxxxx/yy.mp4">
</video>
ちなみに<source src=”“>だとうまくoriginが送信されなかった。
S3のCORSの設定
いつも悩むCORSの設定。AllowedOriginでソースを限定しておくと安心。
<?xml version="1.0" encoding="UTF-8"?>
<CORSConfiguration xmlns="http://s3.amazonaws.com/doc/2006-03-01/">
<CORSRule>
    <AllowedOrigin>https://our.example.com</AllowedOrigin>
    <AllowedOrigin>https://our.staging.example.com</AllowedOrigin>
    <AllowedMethod>GET</AllowedMethod>
    <AllowedMethod>HEAD</AllowedMethod>
    <MaxAgeSeconds>3000</MaxAgeSeconds>
    <AllowedHeader>*</AllowedHeader>
</CORSRule>
</CORSConfiguration>
AWS Lambdaの設定
Requestヘッダにoriginがある場合は、Basic Authは適用せずそのままレスポンスを返す行を追加した。これによし、サーバからのアクセスは許可させる。
ハマりポイントは、リージョン。S3が東京にあってもバージニアにしないといけない。しかし、ログのCloudwatchは東京リージョンにある。
exports.handler = (event, context, callback) => {

  // Get the request and its headers
  const request = event.Records[0].cf.request;
  const headers = request.headers;

  console.log(headers)
  // if it's from our produciton and stating, no need to do authentication
  const originHost = typeof headers.origin == 'undefined' ? null :  headers.origin[0].value;

  if(originHost){
    if(/my\.example\.com/.test(originHost) || /my\.staging\.example\.com/.test(originHost)) {
      callback(null, request);
    }
  }


  // Specify the username and password to be used
  const user = 'xxxxxxxxxxxxxxxxxxxxx';
  const pw = 'xxxxxxxxxxxxxxxxxxxxxxxxxxxxxxxxxxx';

  // Build a Basic Authentication string
  const authString = 'Basic ' + new Buffer(user + ':' + pw).toString('base64');

  // Challenge for auth if auth credentials are absent or incorrect
  if (typeof headers.authorization == 'undefined' || headers.authorization[0].value != authString) {
    const response = {
      status: '401',
      statusDescription: 'Unauthorized',
      body: 'Unauthorized',
      headers: {
        'www-authenticate': [{key: 'WWW-Authenticate', value:'Basic'}]
      },
    };
    callback(null, response);
  }

  // User has authenticated
  callback(null, request);
};
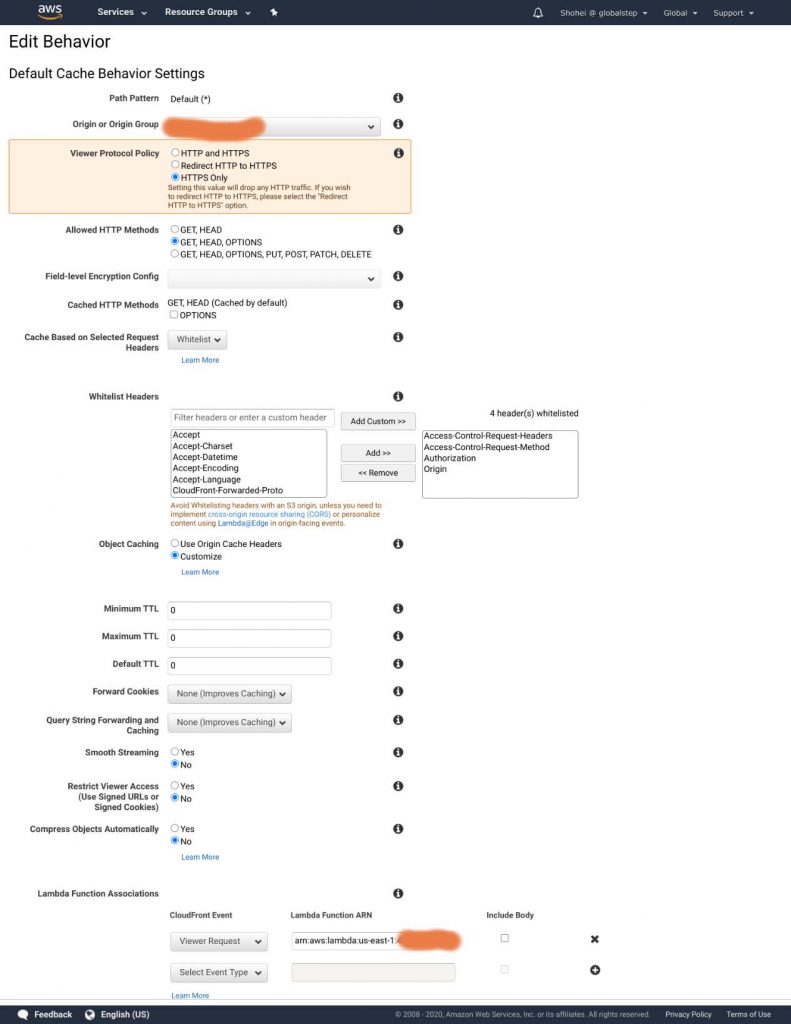
Cloudfrontの設定
- Basic Authなのでhttpsオンリー
- CORSにOPTIONSが必要なときがあるらしいので追加
- whitelistでCORS関連を配信
- TTLはゼロでテスト
- 下記では省いたが、DNSなどを設定した。デフォルトのCloudfrontのホスト名ではなく自ドメインでアクセスできるように。
- ViewリクエストにLambdaのARNを追加。ハマりポイントは、Lambdaのバージョンによって、最後の数字が変わること。Lamdaをpublishしたあとは変更の必要あり。

S3のパーミッション変更
ここまででCloudfront経由でのアクセスはできるはず。S3に外部からアクセスさせなくするために下記を確認。
- Block all public accessのチェックを外す
-
Block public access to buckets and objects granted through new public bucket or access point policies -> On
-
Block public and cross-account access to buckets and objects through any public bucket or access point policies -> On
- Access Control Listにeveryone等権限がないか確認
S3-Cloudfront間の設定
CloudfrontのOriginのタブからOriginを編集する。
- Restrict Bucket Accessにチェック
- Original Access Identityで必要ならば新しいものを作成
- Grand read permissions on Bucketで"Yes, Update Bucket Polity"をチェック
まとめ
上記でうまくいくはず。デバッグはChromeのdevelopper toolのNetwork tabでHTTP request を確認、consoleエラーがないか確認、lambdaのconsole.logで確認とデータの中身を追っていく必要がある。